
Curling Equipment – What You Need to Play
One of the best things about curling is that you do not need much gear to start. Most clubs lend beginners everything they need for their first few sessions – sliders, stabilizers, brooms. You can show up to an open house in clean running shoes and stretchy clothes and be on the ice within minutes.
But if you stick with the sport past your first season, you will want your own gear. Here is the full curling equipment list – what each item does, what it costs, and what matters when picking it.
Curling Shoes – Sliders and Grippers
Curling shoes are the single biggest equipment decision you will make. Unlike regular athletic shoes, a pair of curling shoes has two different soles – one for each foot.
Your sliding foot (left foot for right-handers, right foot for left-handers) has a slider on the bottom – a flat piece of Teflon (PTFE) or stainless steel that lets you glide across the ice during your delivery. Your trailing foot has a gripper – soft rubber with a tread pattern, like a winter tire, that gives you traction on the ice.
That is the core concept: one foot slides, the other grips. Everything about curling shoes is built around that split.
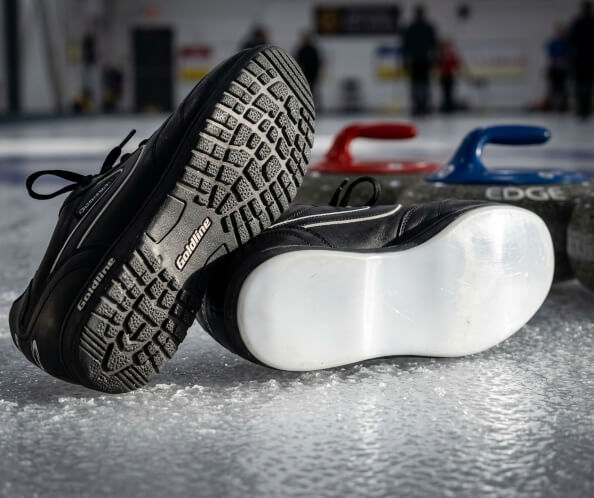
Slider vs gripper – why it matters A thicker slider means less friction, more speed, and a longer slide. A thinner slider is slower and more stable. Beginners usually start with a thin slider (1/16” or 3/32”) or a loaner slip-on slider that fits over a running shoe. Competitive curlers use 3/16” to 1/4” Teflon sliders. The difference in control between a 1/16” and a 1/4” slider is dramatic – it is like going from a bicycle to a sports car on ice.
Slider Thickness | Speed | Who It Suits |
|---|---|---|
1/16” (loaner/slip-on) | Slow | First-timers and try-curling sessions. Most clubs provide these free. |
3/32” | Beginner | New curlers in their first season. Stable but limited slide distance. |
5/32” | Intermediate | Regular league curlers. Good balance of speed and control. |
3/16” | Fast | Experienced curlers. Most coaches recommend this as the minimum for serious play. |
1/4” | Very fast | Competitive and elite curlers. Maximum slide distance with minimal effort. |
Double grippers are shoes with rubber soles on both feet – no slider at all. These are used by stick curlers, coaches, and ice technicians who need traction on both feet at all times.
Slip-on grippers (anti-sliders) are rubber covers that fit over your slider shoe when you are not delivering. You put them on for sweeping and walking, then take them off when it is your turn to throw. Every curler with a slider shoe needs one of these.
What to budget: Entry-level curling shoes run $100-$200 CAD. Mid-range shoes with a 5/32” or 3/16” slider cost $200-$350. Slip-on grippers are $20-$40.
Curling Broom Types
The broom (or brush) has two jobs in curling: sweeping the ice in front of a moving stone, and acting as a balance aid during your delivery.
Broom Type | Description | Best For |
|---|---|---|
Synthetic fabric pad | A flat head with a fabric pad on the bottom. The standard at most clubs today. Pads are replaceable. | Everyone – beginners through competitive. This is what you will use 99% of the time. |
Hair broom (corn broom) | The old-school broom made from corn or horsehair. Rare in modern play but still seen at some traditional clubs. | Nostalgia. Some older curlers still prefer the feel. |
Performance pad (directional) | Specialty fabric pads designed to move more ice with less effort. WCF has placed restrictions on pad materials. | Competitive curlers. Subject to WCF and Curling Canada equipment regulations. |
What to budget: A good synthetic broom costs $50-$150 CAD. Replacement pads are $15-$30. Most clubs have loaner brooms for beginners.
The broom controversy In 2015-2016, competitive curling went through a major equipment debate when certain broom pads were found to give sweepers too much control over a stone’s path – some pads could make a stone move in ways that fundamentally changed the game. The World Curling Federation and Curling Canada responded by restricting the types of fabric pads allowed in sanctioned events. At the club level, standard synthetic pads are fine – the restrictions mostly affect elite competition.
Curling Gloves
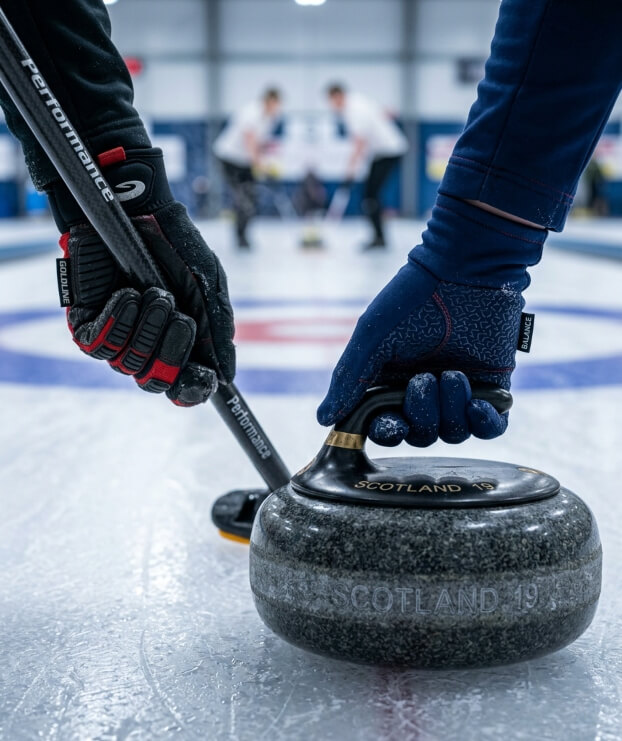
Curling gloves are not mandatory, but most curlers wear them. The ice shed is cold, you are handling a 44-pound granite stone, and you are sweeping hard enough to work up a sweat – your hands need warmth and grip at the same time.
- Lightweight athletic gloves – thin, stretchy, with grip on the palms. These are what most recreational curlers wear. Any running or cycling glove works. Cost: $15-$40.
- Curling-specific gloves – designed with reinforced grip on the broom hand and extra flexibility on the throwing hand. Some have padding on the palm for sweeping. Cost: $30-$70.
The throwing hand matters more than the sweeping hand. You want enough feel to control the stone handle and apply the right rotation on release. A glove that is too thick or stiff will make your delivery less precise. Some curlers throw bare-handed and only wear a glove on the sweeping hand.
What to Wear Curling
There is no uniform in club curling. But what you wear matters more than people expect, because you are dealing with cold ice, physical exertion, and a delivery that requires a deep lunge or a long walking stride.
Clothing | Recommendation |
|---|---|
Pants | Stretchy athletic pants, yoga pants, or track pants. You need full range of motion for the lunge. Jeans are a bad choice – they restrict your legs and get cold fast. |
Top layers | A base layer plus a fleece or quarter-zip. You will warm up from sweeping, so layers you can remove are better than one heavy jacket. |
Socks | Warm athletic socks. Avoid cotton – it holds moisture. Wool or synthetic blend is better. |
Shoes (if no curling shoes) | Clean-soled running shoes or sneakers. The soles must be clean – no gravel, no street dirt. The club will provide a slip-on slider. |
Hat / headband | Optional but useful. The ice shed is typically -4°C to -6°C at ice level, but warmer at head height. |
The clean shoes rule This comes up at every open house. The ice in a curling rink is carefully prepared – pebbled, scraped, and temperature-controlled. A single piece of gravel from a street shoe can scratch the ice and change how stones behave for every game that follows. Clubs take this seriously. Bring a separate pair of clean indoor shoes, or wipe your soles before stepping on.
Other Gear Worth Knowing About
- Stabilizer – a PVC pipe or commercial device that you hold during your delivery for balance. Most clubs have these. Useful for beginners learning the sliding delivery. Not needed for stick curling.
- Knee pad – some curlers wear a pad on the trailing knee, especially if they brush the ice during their slide. Not common at the recreational level.
- Stopwatch – competitive teams use stopwatches to time how long a stone takes to travel between the hog lines. Recreational curlers almost never use one.
- Helmet – Curling Canada recommends head protection, especially for new curlers, juniors, and stick curlers. Not mandatory at most clubs, but falls on ice happen.
The Full Curling Equipment List
Here is everything in one table – what you need for your first session, your first season, and the approximate cost:
Item | First Session | First Season | Cost |
|---|---|---|---|
Curling shoes | Club provides slip-on slider | Buy entry-level pair | $100-$350 |
Slip-on gripper | Not needed yet | Buy with your shoes | $20-$40 |
Broom | Club provides loaner | Buy your own | $50-$150 |
Gloves | Any thin athletic gloves | Same, or curling-specific | $15-$70 |
Pants | Stretchy athletic pants | Same | Already own |
Top layers | Fleece / quarter-zip | Same | Already own |
Clean indoor shoes | Clean running shoes | Replaced by curling shoes | Already own |
Stabilizer | Club provides | Optional | $15-$30 |
Helmet | Recommended | Recommended | $30-$60 |
Total cost for a first-season kit (shoes, gripper, broom, gloves): roughly $200-$500 CAD. You can start lower by buying used – curling gear has a long life span and shows up regularly on club bulletin boards and online marketplaces.
Curling Equipment for Beginners – What to Do First
- Step 1: Go to an open house or try-curling event. Wear clean running shoes and stretchy clothes. The club handles the rest.
- Step 2: If you join a league, curl a few weeks with loaner gear before buying anything. You need to know whether you prefer a slider delivery or a stick delivery – the footwear is different for each.
- Step 3: Buy shoes first. They make the biggest difference to your game. Ask experienced curlers at your club what they recommend – they love talking about gear.
- Step 4: Buy a broom. Loaner brooms work fine, but your own broom will have the right length and pad for your sweeping style.
- Step 5: Everything else – gloves, knee pad, stopwatch – buy as you figure out what you need through playing.
For information on clubs, leagues, and membership costs in the Dundas-Hamilton area, see dgcc.ca. To learn the basic rules and terms of the sport, see the how curling works page.
Prices and availability mentioned on this page are approximate and may vary by club, retailer, and season. Always check with your local club or supplier for current details.